If a program that fails is known to be compatible with Windows 7, the failure is typically
the result of a faulty configuration. In this case, resolving the issue requires you to review
the program settings to pinpoint the configuration error causing the problems experienced. If on
the other hand a program that fails is not fully compatible with Windows 7, you can often
resolve the issue by adjusting compatibility settings or finding an alternate host for the
application.
1. Resolving Software Configuration Issues
Installed applications that have been working properly sometimes malfunction or fail
unexpectedly for an unknown reason. Application errors such as these often result from changes
in configuration settings that are specific to the application, but there are some general
guidelines that can help you in your efforts to resolve these issues.
The following list includes general strategies and features to use in troubleshooting
software configuration problems.
Review application settings If an application suddenly
fails, it is often the result of a configuration change. If you can open the application,
proceed systematically through the available menus and configuration areas of the interface
to see if any settings have been set improperly. If an application relies on a database or
specific type of file (such as Microsoft Outlook, which relies on .pst files), then make sure
that the database or file in question is accessible and not corrupted. If the application
relies on a network resource, check network settings and ensure that the network resource is
both accessible and available. During this phase of troubleshooting, you should also perform research on the Web about
the issue experienced and contact the application manufacturer if necessary. Using Event Viewer As part of your troubleshooting process, you should use Event Viewer to find
error messages related to the application you are troubleshooting. Event Viewer can help you
determine when errors related to the application started appearing and ultimately help you
determine the cause of failure. Pay special attention to the Application log and any logs
that are specific to the application in question. Use the Filter Current Log function to
locate only Critical, Warning, and Error messages. If you find errors that seem relevant,
perform Web searches on these errors to learn more about them if necessary. Using Event Forwarding Troubleshooting a network-wide application issue might require you to review
logs on multiple computers. To simplify this procedure, you can use Event
Forwarding, a feature in which multiple computers are configured to forward a
particular event to a collecting computer. Using the Event Forwarding feature requires that you
configure both the forwarding computers, called the source computers,
and the collecting computer, called the collector. To configure event forwarding, perform the following steps: On each source computer, type the following at an elevated command prompt: winrm quickconfig
On the collector computer, type the following at an elevated command prompt: wecutil qc
Add the computer account of the collector computer to the local Administrators group
on each of the source computers. In Event Viewer on the collector computer, choose Create Subscription, and then follow
the prompts to specify both the event you want to collect and the source computers on which
you want to collect them.
Note:
EVENT FORWARDING REQUIRES CERTAIN SERVICES TO BE RUNNING
Event forwarding depends on the Windows Remote Management (WinRM) service and the Windows Event Collector
(Wecsvc) service. Both of these services must be running on computers participating in the
forwarding and collecting process.
System Restore An application can fail because of changes to the operating system. If an
application stops functioning after you install an update or make a system change, consider
using the System Restore feature to revert the computer's configuration to a time when the
application functioned properly. Although this feature does not remove or change user files
such as documents or e-mail, it will remove any applications, updates, or system changes that
have occurred since the system restore point.
Note:
OPENING SYSTEM RESTORE
To start the System Restore Wizard, click Start, type system
restore, and then press Enter.
Repairing or reinstalling software If software stops functioning but you cannot revert to an earlier state manually or
automatically, you should attempt to repair the software in question. A repair option, if
available, essentially reinstalls the application while preserving user files and settings
for that application. If no such repair option is available, you can back up the user files
and simply reinstall the software. To perform a fresh installation, you might need to
uninstall the software first. Restoring from backup If a critical application fails but you cannot repair it by using any of the
methods listed previously, you should restore the entire system from a backup of the last
functioning version of the computer. Before doing so, be sure to perform a backup of the
user's personal files and folders.
2. Understanding Application Compatibility
Each release of Windows includes new features and capabilities that affect how
applications run. Before making adjustments to improve application compatibility, you should
gain some understanding of the particular features in Windows 7 that are most likely to cause
application compatibility problems. These particular features can generally be classified as
security enhancements and operating system changes.
2.1. Security Enhancements Affecting Application Compatibility
Many organizations deploying Windows 7 will be replacing Windows XP on their clients, not
Windows Vista. Compared to Windows XP, the Windows 7 environment offers a number of important
security-related enhancements. The following security features are the ones most likely to
lead to compatibility problems with third-party applications:
User Account Control Introduced in Windows Vista,
User Account Control (UAC) separates standard user privileges from administrator
privileges in a way that helps reduce the effect of malware, unauthorized software
installation, and unapproved system changes. If you are logged on as an administrator, UAC
by default prompts you to confirm some tasks that you want to perform that require
administrator privileges. If you are logged on as a standard user and attempt to perform a
task that requires administrator privileges, UAC gives you an opportunity to enter
administrator credentials instead of denying you the right to perform the task
outright. UAC can introduce problems in applications that are not compliant with this technology
enhancement. For this reason, it is important to test applications with UAC enabled before
you deploy them. Windows Resource Protection (also called File and Registry
Virtualization)
Windows Resource Protection is a feature in Windows Vista and Windows 7
that intercepts any application requests to write to protected system files or registry
locations and then redirects these requests to safe and temporary locations. Although most
applications can handle this redirection without generating an error, some applications
require full access to the protected areas and cannot handle the redirection process. Internet Explorer Protected Mode
Protected Mode is a feature of Windows Internet Explorer 8 that
protects computers from malware by restricting the browser's access within the registry and
file system. Although Protected Mode helps maintain the integrity of client computers, it
can affect the proper operation of older applications, ActiveX controls, and other script
code. Operating system and Internet Explorer versioning Many applications check the version of the operating system and behave
differently or fail to run when an unexpected version number is detected. You can resolve
this issue by setting appropriate compatibility modes or applying versioning shims
(application-compatibility fixes).
2.2. Operating System Changes Affecting Application Compatibility
Of the many operating system changes introduced by Windows 7, the following features are
most likely to lead to application compatibility difficulties:
New system Application Programming Interfaces
(APIs) APIs expose layers of the Windows 7 operating system differently than they did
in previous versions of Windows. Antivirus and firewall software are examples of
applications that rely on these new APIs to monitor and protect Windows 7. Applications that relied on outdated APIs will need to be upgraded or replaced for
Windows 7. Windows 7 64-bit Neither 16-bit applications nor 32-bit drivers are supported in the Windows 7
64-bit environment. The automatic registry and system file redirection that allows some
older applications to function in the 32-bit version of Windows 7 are not available for the
64-bit environment. For these reasons, new 64-bit applications must comply fully with
Windows 7 application standards. Operating system version Many older applications check
for a specific version of Windows and stop responding when they fail to find this specific
version. Features built into Windows 7 such as the Program Compatibility Assistant
(discussed in the next section) can usually resolve this type of issue automatically. New folder locations User folders, My Documents folders, and folders with localization have changed
since Windows XP. Applications with hard-coded paths may fail.
2.3. Using Windows 7 Built-in Compatibility Tools
Although you should perform extensive application compatibility testing before you deploy
Windows 7, compatibility problems may unexpectedly appear or persist after deployment. To help
you improve the compatibility of older programs after deployment, Windows 7 provides three
tools: the Program Compatibility Assistant (PCA), the Program Compatibility Troubleshooter, and the Compatibility tab in a program's Properties dialog box.
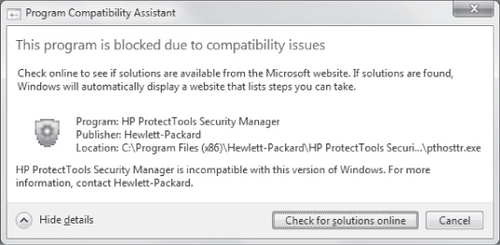
PCA The PCA is a tool that automatically appears when
Windows 7 detects known compatibility issues in older programs. When it does appear, the PCA
can offer to fix the problem. For example, the PCA can resolve conflicts with UAC, or it can
run the program in a mode that simulates earlier versions of Windows. If you agree to the
changes PCA proposes, these changes are then performed automatically. Alternatively, if the
compatibility issue detected is serious, the PCA can warn you or block the
program from running. When the PCA recognizes a problem but cannot offer a fix, it will give you an option to
check online for possible solutions, as shown in Figure 1.
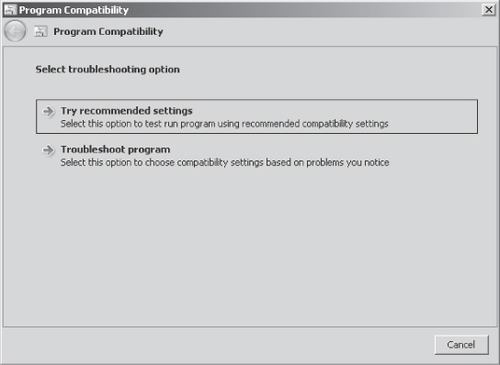
Program Compatibility Troubleshooter The Program Compatibility Troubleshooter is a Control Panel program that you
can use to configure the compatibility settings for an older program if you notice that the
program is not running smoothly. For example, you can configure the program to run in a
simulated environment of a previous version of Windows, to run with specific display
settings, or to run with Administrator privileges. To start the wizard, in Control Panel, first click Programs, and then, in the Programs
and Features category, click Run Programs Made For Previous Versions Of Windows. You can
also start the Program Compatibility Troubleshooter by right-clicking an application and
selecting Troubleshoot Compatibility from the shortcut menu, as shown in Figure 2.

A page of the Program Compatibility Troubleshooter is shown in Figure 3.
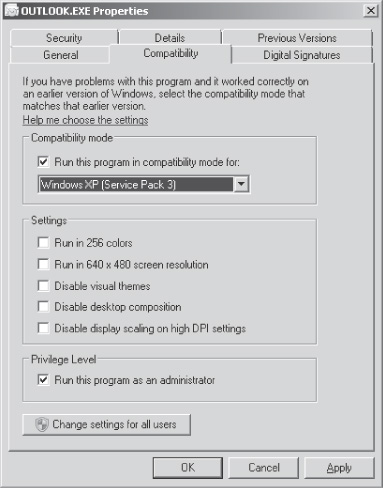
Compatibility Tab As an alternative to running the Program Compatibility Troubleshooter, you can
simply configure compatibility settings on the Compatibility tab within the Properties sheet
of any given program. The options provided on this tab are the same as those you can
configure through the Program Compatibility Troubleshooter. The Compatibility Tab is shown
in Figure 4.
Note that adjusting the compatibility settings of a program does not always fix the problem. If issues
persist, you should attempt alternate hosting or obtain an updated version of the
program.
2.4. Alternate Hosting for Application Compatibility
In some cases, your organization will need to support an application whose compatibility
issues with Windows 7 cannot be resolved immediately. For example, if you are running a 64-bit
version of Windows 7, you cannot run 16-bit applications by merely adjusting the compatibility
settings of the program. Until a newer, more compatible version of the application appears (or
until your organization finds an alternate application), you must find a temporary fix for the
application compatibility problem.
The most common temporary fix for unresolved application compatibility problems such as
this is simply to run the program within the old operating system in a virtual machine, on a
remote server that can be accessed through Remote Desktop, or both.
The following list describes various options of hosting an older application on an older
operating system:
Microsoft Virtual PC 2007 You can use Virtual PC to run applications that function properly only with
older versions of Windows. For example, if your organization needs to support a 16-bit
application within a 64-bit version of Windows 7, you can use Virtual PC 2007 to run the program within a virtual machine running a previous
version of Windows. Although virtual machine software such as Virtual PC is required to run
16-bit applications in 64-bit versions of Windows 7, the use of Virtual PC need not be
reserved only for this purpose. Virtual PC also lets users keep a previous version of
Windows until upgraded versions of older applications are developed. Whenever you need to
support an older application that does not run smoothly in Windows 7 and that cannot be
upgraded, you should consider running the application inside a virtual machine. Windows XP Mode
Windows XP Mode is essentially a downloadable enhancement to Virtual PC
that is available in Windows 7 Professional, Enterprise, and Ultimate. Windows XP Mode also
requires special virtualization technology. Specifically, Windows XP Mode requires a CPU
with Intel-VT or AMD-V technology, and this technology must be enabled in the BIOS. For eligible computers, Windows XP Mode enables you to access through the Start menu in
Windows 7 any applications installed in a Windows XP guest virtual machine in Virtual PC.
You then interact with these applications exactly as if they were installed natively in
Windows 7. Windows XP Mode also provides an enormous performance advantage: It gives the
Windows XP guest operating system direct access to the system hardware, so performance is
much better than it is in Virtual PC alone. To install Windows XP Mode is easy: First download and install Virtual PC, and then
download and install Windows XP Mode. You can perform both tasks from the Virtual PC Web
site at http://www.microsoft.com/windows/virtual-pc/download.aspx. (Both
Virtual PC and Windows XP Mode are free.)
Note:
MORE INFO
WINDOWS XP MODE
For step-by-step instructions on using Windows XP Mode,
including installing and using applications, visit
http://www.microsoft.com/windows/virtual-pc/support/default.aspx. You can also view a five-minute introduction to Windows XP Mode at
http://windows.microsoft.com/en-us/windows7/help/videos/using-windows-xp-mode.
Hyper-V on Windows Server 2008 Hyper-V is a high-performance virtualization environment available in Windows
Server 2008. It allows you to create guest virtual machines with direct access to the
hardware. On the virtual machines, you can install any version of Windows. If you choose to host an application on a virtual machine inside Hyper-V, clients
running Windows 7 or other operating systems can then connect remotely to this application
from over the network. Hyper-V requires a 64-bit processor with virtualization technology (Intel-VT or
AMD-V). Remote Desktop Services for Hosting
Applications Hosting older applications on Remote Desktop Services lets you deliver
Windows-based applications or the Windows desktop itself to virtually any computer device on
your network. Clients running Windows 7 can connect to these application-hosting
environments through Remote Desktop.
2.5. Understanding the Application Compatibility Toolkit (ACT)
The Application Compatibility Toolkit (ACT) is a tool you can use to identify application
compatibility issues before Windows 7 deployment.
The following are some of the major components that make up the ACT solution:
Application Compatibility Manager A tool that enables you to collect and analyze your data so that you can
identify any issues prior to deploying a new operating system or deploying a Windows update
in your organization. You use this program heavily during the initial phases of an
application migration project. Consider this tool as the primary user interface for
ACT. Application Compatibility Toolkit Data
Collector The Application Compatibility Toolkit Data Collector is distributed to each computer. It then
performs scans by using compatibility evaluators. Data is collected and stored in the
central compatibility database. Setup Analysis Tool (SAT) The SAT automates the running of application installations while monitoring the
actions taken by each application's installer. Standard User Analyzer (SUA) The SUA determines the possible issues for applications running as a standard
user in Windows 7.
ACT is an important tool for testing applications across a wide variety of computers and
operating systems within your organization.
2.6. Configuring Application Compatibility Diagnostics Through Group Policy
Windows Server 2008 includes a set of policy options related to application compatibility
diagnostics. To browse these settings in a GPO, browse to Computer
Configuration\Policies\Administrative Templates\System\Troubleshooting And
Diagnostics\Application Compatibility Diagnostics.
The Application Compatibility Diagnostics container includes the following six
policies:
Notify Blocked Drivers This policy setting determines whether the PCA will notify the user if drivers
are blocked because of compatibility issues. If you enable this policy setting, the
PCA notifies the user of blocked driver issues and provides the user with an option to check
the Microsoft Web site for solutions. (This behavior is also the default behavior in Windows
7.) If you disable this policy setting, the PCA does not notify the user of blocked driver
issues. Note that if this policy setting is configured as disabled, the user is not
presented with solutions to blocked drivers. Detect Application Failures Caused By Deprecated Windows COM
Objects This policy setting determines whether the PCA will notify the user when a
COM object creation failure is detected in an application. If you enable this policy
setting, the PCA detects programs creating older COM objects that are removed in this version of Windows.
(This behavior is also the default behavior in Windows 7.) When this failure is detected,
after the program is terminated, PCA notifies the user about this problem and provides an
option to check the Microsoft Web site for solutions. If you disable this policy setting,
the PCA does not detect programs creating older COM objects. Detect Application Failures Caused By Deprecated Windows
DLLs This policy setting determines whether the PCA will notify the user when a DLL
load failure is detected in an application. If you enable this policy setting, the PCA
detects programs trying to load older Microsoft Windows DLLs that are removed in this
version of Windows. (This behavior is also the default behavior in Windows 7.) When this
failure is detected, PCA notifies the user about this problem after the program is
terminated and provides an option to check the Microsoft Web site for solutions. If you
disable this policy setting, the PCA does not detect programs trying to load older Windows
DLLs. Detect Application Install Failures This policy setting configures the PCA to notify the user when an application
installation has failed. If you enable this policy setting, the PCA detects application
installation failures and provides the user with an option to restart the installer in
Windows XP compatibility mode. (This behavior is also the default behavior in Windows 7.) If
you disable this policy setting, the PCA does not detect program installation failures. Detect Application Installers That Need To Be Run As
Administrator This policy setting determines whether the PCA will notify the user when
application installations have failed because they need to be run as an administrator. If
you enable this policy setting, the PCA detects such installation failures and provides the
user with an option to restart the installer programs as an administrator. (This behavior is
also the default behavior in Windows 7.) If you disable this policy setting, the PCA does
not notify users when installer program failures have occurred for this reason. Detect Applications Unable To Launch Installers Under
UAC This policy setting configures the PCA to notify the user when UAC is
preventing an application from launching an installer (typically an updater program). If you
enable this policy setting, the PCA detects programs that fail to start installers and
grants administrator privileges that allow this task to be performed the next time the
program is run. (This behavior is also the default behavior in Windows 7.) If you disable
this policy setting, the PCA does not detect applications that fail to launch installers run
under UAC.
2.6.1. PRACTICE: Configuring Application Compatibility Diagnostics
In this exercise, you configure application compatibility settings in Group
Policy.
EXERCISE Creating a Policy for Application Compatibility
Settings
In this exercise, you create a new GPO named Application Compatibility Diagnostics
Policy. In the GPO, you enable two settings that enable particular behaviors in the
PCA.
Log on to the domain controller as a domain administrator. Click Start, type Group Policy Management, and then
click OK. The Group Policy Management console opens. In the Group Policy Management console tree, expand Forest: nwtraders.msft and then
Domains. Beneath the Domains container, select and right-click the Nwtraders.msft icon, and
then click the option to Create A GPO In This Domain, And Link It Here. The New GPO dialog
box opens. In the New GPO dialog box, type Application Compatibility
Diagnostics Policy, and then click OK. In the Details pane of the Group Policy Management console, ensure that the Linked
Group Policy Objects tab is selected. Then, in the list of GPOs, right-click Application
Compatibility Diagnostics Policy, and then click Edit. A Group Policy Management Editor
window opens. In the console tree of the Group Policy Management Editor, navigate to Computer
Configuration\Policies\Administrative Templates\System\Troubleshooting and
Diagnostics\Application Compatibility Diagnostics. In the details pane of the Group Policy Management Editor, double-click the policy
named Detect Application Failures Caused By Deprecated Windows DLLs. The associated policy
setting Properties dialog box opens. Read the description of the policy setting. Note that the Diagnostic Policy Service
and the Program Compatibility Assistant Service must be running on Windows 7 for the
Program Compatibility Assistant to execute. These services run by default on domain-joined
computers running Windows 7. In the Scenario Execution Level drop-down list box, ensure that Detection,
Troubleshooting, And Resolution is selected. Click OK. In the details pane of the Group Policy Management Editor, the policy
setting should now appear as Enabled. In the details pane of the Group Policy Management Editor, double-click the policy
setting named Detect Application Install Failures. The associated policy setting Properties
dialog box opens. Read the description of the policy setting, and then click Enabled. Click OK. In the details pane of the Group Policy Management Editor, the policy
setting should now appear as Enabled.
|